NestJS: Server framework on steroids 🎉
NestJS is the turbo framework for NodeJS devs! 🚀 With TypeScript, OOP & FP every line of code becomes a pleasure! 😎

In a previous article, I described how you can build a REST API with bare JavaScript and NodeJS. If you are interested in the article, take a look here 👇

However, the fact is that it rarely stops at just one little thing. As a rule, there will later be requirements such as authentication, authorization, storage of data in a database or similar.
In order to simplify this and avoid having to rewrite recurring code yourself, established frameworks are used. In the JavaScript/TypeScript environment, NestJS has established itself very well for me and is excellent for exactly this case.
In essence, I come from front-end development (Angular to be precise) and didn't want to get involved with another technology here and continue to move within my comfort zone. And this is exactly where NestJS comes into play.
What is NestJS 🤔
NestJS is a server-side, but through NodeJS, platform-independent framework, which already offers you many solutions and tools for many tasks.

It's like the toolbox you have in your basement and always fall back on when you want to do something special. A small quote from the documentation:
Nest (NestJS) is a framework for building efficient, scalable Node.js server-side applications. It uses progressive JavaScript, is built with and fully supports TypeScript (yet still enables developers to code in pure JavaScript) and combines elements of OOP (Object Oriented Programming), FP (Functional Programming), and FRP (Functional Reactive Programming).
Under the hood, Nest makes use of robust HTTP server frameworks like Express (the default) and optionally can be configured to use Fastify as well!
Nest provides a level of abstraction above these common Node.js frameworks (Express/Fastify), but also exposes their APIs directly to the developer. This gives developers the freedom to use the myriad of third-party modules which are available for the underlying platform.
NestJS also actively supports you in building a robust and scalable application by taking you by the hand and providing you with an already mature architecture. Nice!

Basic to NestJS 🧱
NestJS is therefore not just another framework, but a real asset for any developer who wants to make their applications scalable, maintainable and extendable. But what exactly makes NestJS so special? Let's start with the architecture. NestJS is based on modules, providers and controllers that are organized in a hierarchical structure. This allows a clear separation of the different application areas and thus promotes a modular and maintainable code base.
NestJS relies on TypeScript ☝️
Another point that makes NestJS stand out is the integration of TypeScript. TypeScript brings type safety to the world of JavaScript and helps to detect many errors during the development phase. For someone like me, who comes from the Angular world, this is a very welcome feature as it makes development safer and more predictable.
Why you should also use TypeScript for your projects and what benefits it brings you, I have already explained in a previous article 👇

Now for the practical aspects: NestJS offers a variety of modules for common tasks such as authentication, database integration, caching, file processing and much more. By using these modules, you can save yourself repetitive tasks and concentrate on the essentials, your own business logic. NestJS makes it easy to write clean, well-structured code that is also easy to test.
Structure of NestJS 🚧
In the world of NestJS, controllers, modules and services are some of the core components that make it possible to design a structured and efficient API. Here are practical examples of these important building blocks:
Controllers
Controllers in NestJS are responsible for handling incoming requests and returning responses.
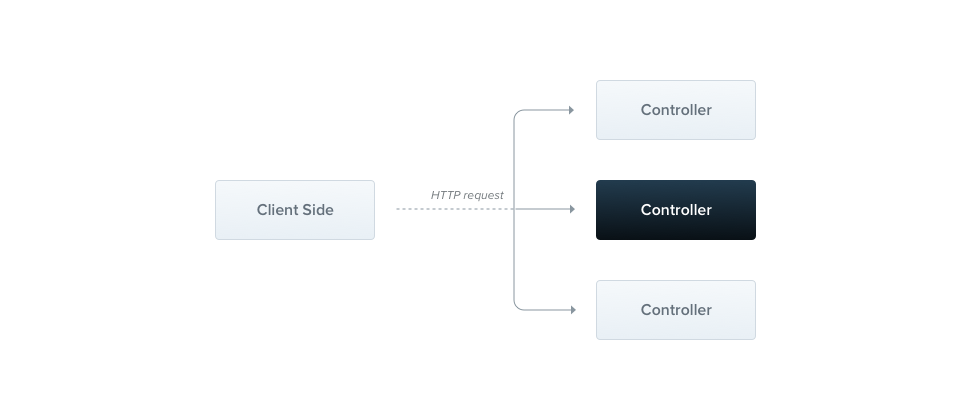
They are defined by decorating classes with @Controller(). Here is a simple example:
import { Controller, Get, Post, Body, Param } from '@nestjs/common';

@Controller('items')
export class ItemsController {
    @Get()
    findAll(): string {
        return 'This action returns all items';
    }

    @Get(':id')
    findOne(@Param('id') id: string): string {
        return `This action returns a single item with id ${id}`;
    }

    @Post()
    create(@Body() createItemDto: any): string {
        return 'This action adds a new item';
    }
}
In this example, the ItemsController defines routes for retrieving all items, retrieving a single item by its ID and creating a new item.
Services
Services in NestJS are responsible for encapsulating business logic. They are typically providers that are decorated with @Injectable() and can be injected into controllers or other services. Here is a simple example of a service:
import { Injectable } from '@nestjs/common';

@Injectable()
export class ItemsService {
    private readonly items = [];

    findAll(): string[] {
        return this.items;
    }

    findOne(id: string): string {
        return this.items.find(item => item.id === id);
    }

    create(item: any): void {
        this.items.push(item);
    }
}
The services are provided via the providers in the module and are thus available via a dependency injection.
Provider
In NestJS, providers are a fundamental concept as they are responsible for most of the business logic in an application. Providers can be services, repositories, factories, helpers and more. They are usually classes that are decorated with @Injectable() and are included in the NestJS dependency injection system.
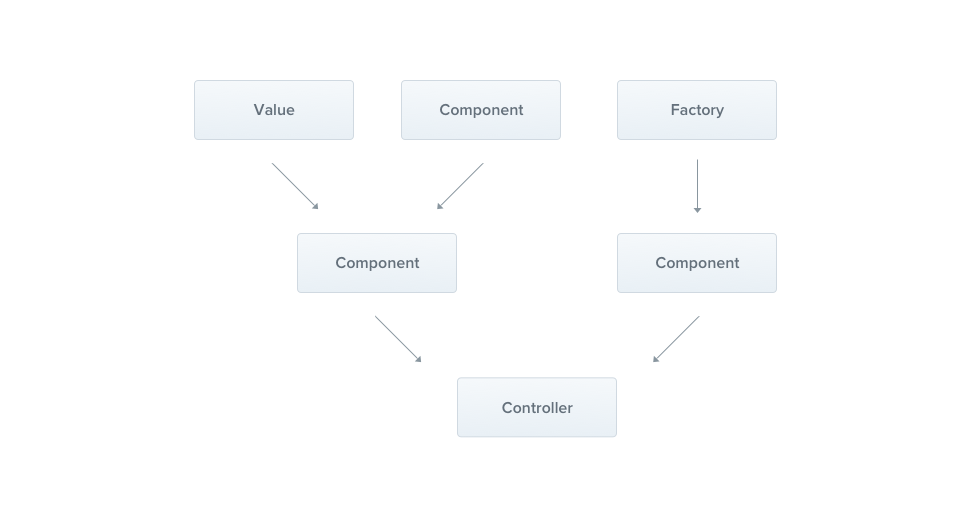
Here are some examples and applications of providers:
Service as provider
Services are the most commonly used providers in NestJS. They encapsulate business logic, data access and other functions that can be reused by different parts of the application.
Custom Provider
NestJS also allows you to create custom providers. This is useful if you want to include complex logic or third-party services. Here is an example of a custom provider:
import { Injectable, Inject } from '@nestjs/common';

const CATS_REPOSITORY = 'CATS_REPOSITORY';

@Injectable()
export class CatsService {
  constructor(@Inject(CATS_REPOSITORY) private catsRepository) {}

  findAll(): any[] {
    return this.catsRepository.findAll();
  }
}

const catsRepository = {
  findAll() {
    // Implementation of the method
  }
};

const customProviders = [
  {
    provide: CATS_REPOSITORY,
    useValue: catsRepository,
  },
];
Factory providers
Factory providers are another form of provider where a factory function is used to create the provider. This can be useful if the creation of the provider is more complicated or depends on certain conditions.
import { Injectable, Inject, FactoryProvider } from '@nestjs/common';

@Injectable()
export class LoggerService {
  log(message: string) {
    console.log(message);
  }
}

const loggerFactory: FactoryProvider = {
  provide: 'LOGGER',
  useFactory: () => {
    const logger = new LoggerService();
    // Configuration of the logger
    return logger;
  },
};
Here, a LoggerService is created as a factory provider by defining a factory function that instantiates and returns the LoggerService.
Modules
Modules are a way to organize applications and components in NestJS. A module encapsulates providers, controllers and other modules.
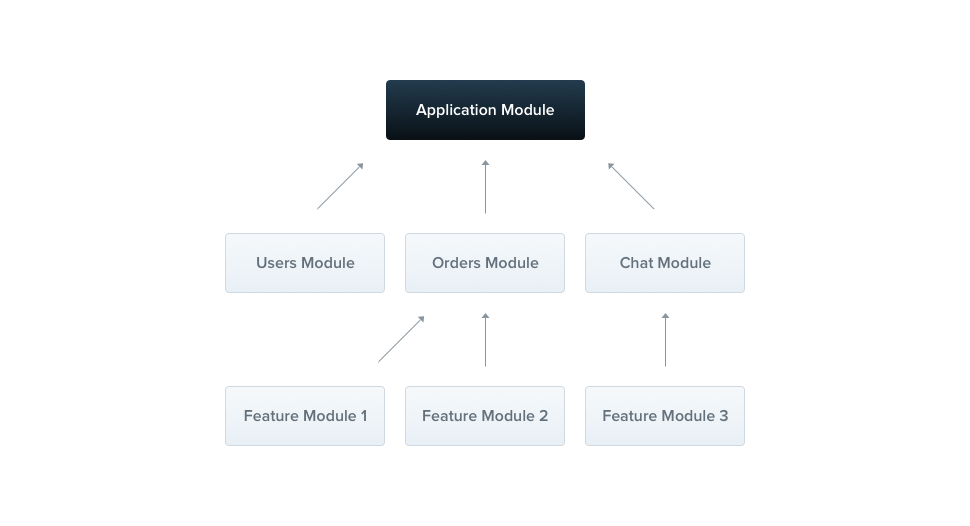
Here's a simple example:
import { Module } from '@nestjs/common';
import { ItemsController } from './items.controller';
import { ItemsService } from './items.service';

@Module({
  controllers: [ItemsController],
  providers: [ItemsService],
})
export class ItemsModule {}
Middleware
Middleware are functions that are executed before the route handlers. They can be used for a variety of tasks, such as logging, authentication, and so on.

Here is a simple middleware example in NestJS:
import { Injectable, NestMiddleware } from '@nestjs/common';
import { Request, Response, NextFunction } from 'express';

@Injectable()
export class LoggerMiddleware implements NestMiddleware {
  use(req: Request, res: Response, next: NextFunction) {
    console.log(`Request made to: ${req.baseUrl}`);
    next();
  }
}
Guards
Guards are used for authentication and authorization. They decide whether a specific request should be continued.

Here's an example of how you could implement a simple guard in NestJS:
import { Injectable, CanActivate, ExecutionContext } from '@nestjs/common';

@Injectable()
export class RolesGuard implements CanActivate {
  canActivate(context: ExecutionContext): boolean {
    const request = context.switchToHttp().getRequest();
    const user = request.user;
    return user && user.role === 'admin';
  }
}
Exception Filters
Exception filters enable customizable error handling. You can define how unexpected errors and exceptions should be handled.
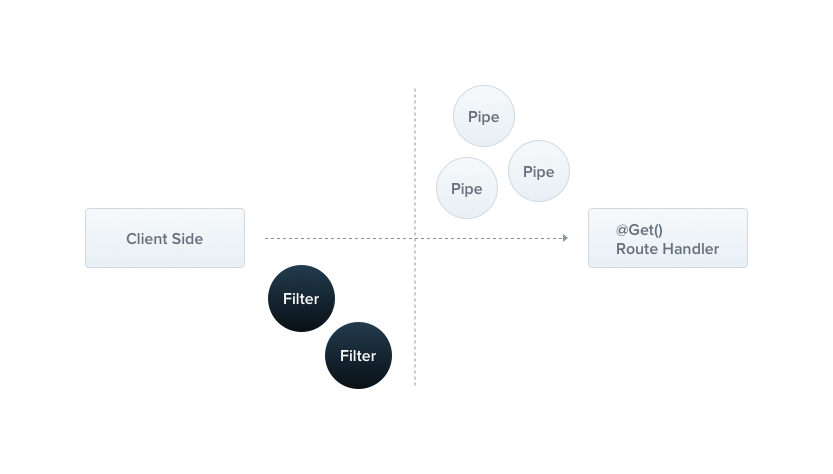
Here is a simple example of an exception filter:
import { ExceptionFilter, Catch, ArgumentsHost, HttpException } from '@nestjs/common';

@Catch(HttpException)
export class HttpExceptionFilter implements ExceptionFilter {
  catch(exception: HttpException, host: ArgumentsHost) {
    const ctx = host.switchToHttp();
    const response = ctx.getResponse();
    const status = exception.getStatus();

    response.status(status).json({
      statusCode: status,
      timestamp: new Date().toISOString(),
      path: ctx.getRequest().url,
    });
  }
}
Interceptors
Interceptors provide a way to introduce additional logic before or after the execution of a method. They are useful for logging, transforming responses and much more.
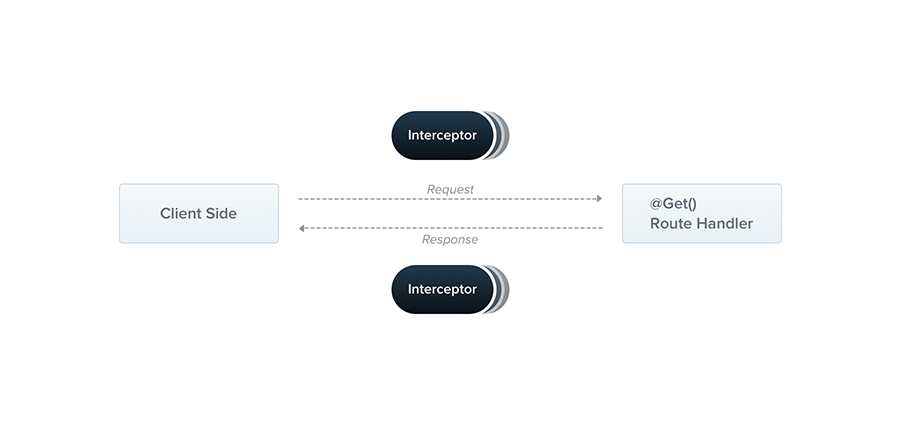
Here is an example:
import { Injectable, NestInterceptor, ExecutionContext, CallHandler } from '@nestjs/common';
import { Observable } from 'rxjs';
import { tap } from 'rxjs/operators';

@Injectable()
export class LoggingInterceptor implements NestInterceptor {
  intercept(context: ExecutionContext, next: CallHandler): Observable<any> {
    console.log('Before...');
    const now = Date.now();

    return next
      .handle()
      .pipe(
        tap(() => console.log(`After... ${Date.now() - now}ms`)),
      );
  }
}
Pipes
Pipes are used for data transformation and validation. They can be used to check or process input data before it reaches a handler. Here is an example of a simple pipe:
import { PipeTransform, Injectable, ArgumentMetadata, BadRequestException } from '@nestjs/common';

@Injectable()
export class ValidationPipe implements PipeTransform {
  transform(value: any, metadata: ArgumentMetadata) {
    if (!value) {
      throw new BadRequestException('No data provided');
    }
    // Perform validation logic
    return value;
  }
}
The CLI 🪄
The NestJS CLI (Command Line Interface) is an essential tool that speeds up the development process by simplifying the setup, development and management of NestJS applications. The CLI can be used to generate new projects, modules, controllers, services and more, contributing to consistent and efficient development. The CLI is installed as follows:
npm install -g @nestjs/cli
# or
yarn global add @nestjs/cli
Creating a new project
With the CLI, you can create a new NestJS project with a preconfigured project structure. After installation, simply execute the following command:
nest new project-name
This command creates a new directory with the name project-name and sets up a new NestJS project with all the required dependencies.
Generate components 📃
The CLI makes it easy to add components to your project. This allows you to create things quickly. These include:
Creating a controller:
nest generate controller catsThis command creates a new controller with the name cats.controller.ts and the associated test file cats.controller.spec.ts in the src/cats directory.
Creating a service:
nest generate service catsThis command creates a new service called cats.service.ts and the associated test file cats.service.spec.ts.
Creating a module:
nest generate module catsThis command creates a new module called cats.module.ts.
Starting the application 🏎️
To start your NestJS application, navigate to the project directory and run the following command:
npm run start
Other useful CLI commands 🤖
- Linting: To check the code quality, you can use
npm run lint. - Build: To compile a project for production, use
npm run build.
The NestJS CLI offers a variety of other features and options that optimize your workflow and facilitate the development of NestJS applications. By using the CLI, you can ensure that your project structure is consistent, well-organized and follows best practices. More information and detailed documentation can be found in the official NestJS documentation.

Cool additional features ✨
GraphQL made easy
With NestJS, you can easily implement GraphQL APIs. The framework offers seamless integration with Apollo and allows you to create powerful and flexible GraphQL interfaces with just a few lines of code. This is especially cool if you're into modern data retrieval and manipulation.
Hybrid application types
NestJS is not limited to REST or GraphQL. You can create hybrid applications that offer REST and GraphQL endpoints at the same time, for example. This increases flexibility and makes NestJS a versatile tool in your developer arsenal.
WebSockets integrated
Real-time functionalities are often indispensable in modern applications. NestJS makes it easy to work with WebSockets by simplifying the integration of Socket.io or other libraries. This allows you to incorporate real-time communication into your applications without much effort.
CQRS module
For more complex use cases where a separation between command and query responsibility is required, NestJS offers a CQRS module. This supports you in building scalable and maintainable software architectures.
Decorative programming
With the decorative approach of NestJS, you can express your intentions clearly and precisely. Whether you're defining routes, injecting dependencies or applying guards and interceptors, everything is done with a clean and readable syntax.
First-class microservice support
NestJS is not just for building monolithic applications. It provides robust support for microservices with a variety of transport mechanisms, including MQTT, Redis, RabbitMQ and more. This allows you to design scalable and efficient microservice architectures.
Dynamic modules
Another cool feature is dynamic modules. They allow you to configure modules and even create modules based on different environments or conditions. This gives you tremendous flexibility and power, especially in complex and dynamic application scenarios.
OpenAPI (Swagger) integration
NestJS provides built-in support for OpenAPI, also known as Swagger. With just a few decorators in your controllers and models, you can automatically generate a complete OpenAPI specification of your API. This means you get interactive documentation, client SDK generation and much more, with virtually no extra effort. This is particularly useful for quickly and clearly documenting API endpoints for front-end developers or external partners. It significantly improves the accessibility and comprehensibility of your API.
Prisma Integration
Prisma is a nextgen ORM for Node.js and TypeScript that stands out for its ease of use and performance. NestJS can be seamlessly integrated with Prisma to enable efficient and easy database abstraction and manipulation. With Prisma, you can define your database schemas as models and write powerful queries that are type-safe, simplifying the development and maintenance of data-intensive applications.
Hot Reload (with Webpack HMR)
Developers love fast feedback. NestJS supports Hot Reload through Webpack's Hot Module Replacement (HMR). This allows you to make changes to your code that are applied to the running application in real time, without the need for a restart. This saves valuable development time and increases productivity as you receive immediate feedback on the effects of your changes. To take advantage of this, simply start your NestJS server with the appropriate HMR configuration and you can see the changes live as soon as you save your code.
CRUD Generator
With NestJS's CRUD Generator, you can quickly create effective and standardized CRUD operations for your application with little effort. This tool automates the creation of typical CRUD modules, controllers and services, so you can focus on the specific requirements and business logic of your application instead of writing repetitive code manually.
Conclusion 💡
To summarize, NestJS is an excellent choice for modern, server-side applications. The combination of modern JavaScript, type safety through TypeScript, a solid architecture and a large selection of pre-built modules makes it an invaluable tool for developers.
NestJS takes a lot of work off our hands while leaving us enough room to design our applications according to our ideas. Whether for small projects or large enterprise applications - NestJS is definitely worth a look.
It is also based on the concepts of Angular and is therefore predestined for Angular developers.
So why not jump straight into your next project with NestJS and experience for yourself how it simplifies and speeds up development?


