Reaching internal services with an external DNS wildcard
In this article, I'll show you how to manage your internal services, both externally and internally, with (sub)domains and HTTPS 🎉

Since I have my HomeLab at home, the question naturally arises as to how I can manage to address the internal services via speaking domain names. Internal HTTPS would also be great, of course. I just don't want to remember IPs or hostnames anymore, just (sub)domains.
Considerations 🤔
Fundamentally, you need to think about whether you want to access your services externally at all. If not, it doesn't matter, we'll do it all later.
Before we can do anything at all, you need to check whether you have a static or dynamic IP address. Your connection is identified via this IP and can also be used externally via this IP later on. If you don't have an external IP or are using a dual stack, this will of course be a little more difficult.
You will also need an external domain with a host of your choice. I myself have been with All-Inkl. since 2008 and am very satisfied with them 👇

DynDNS (DDNS)
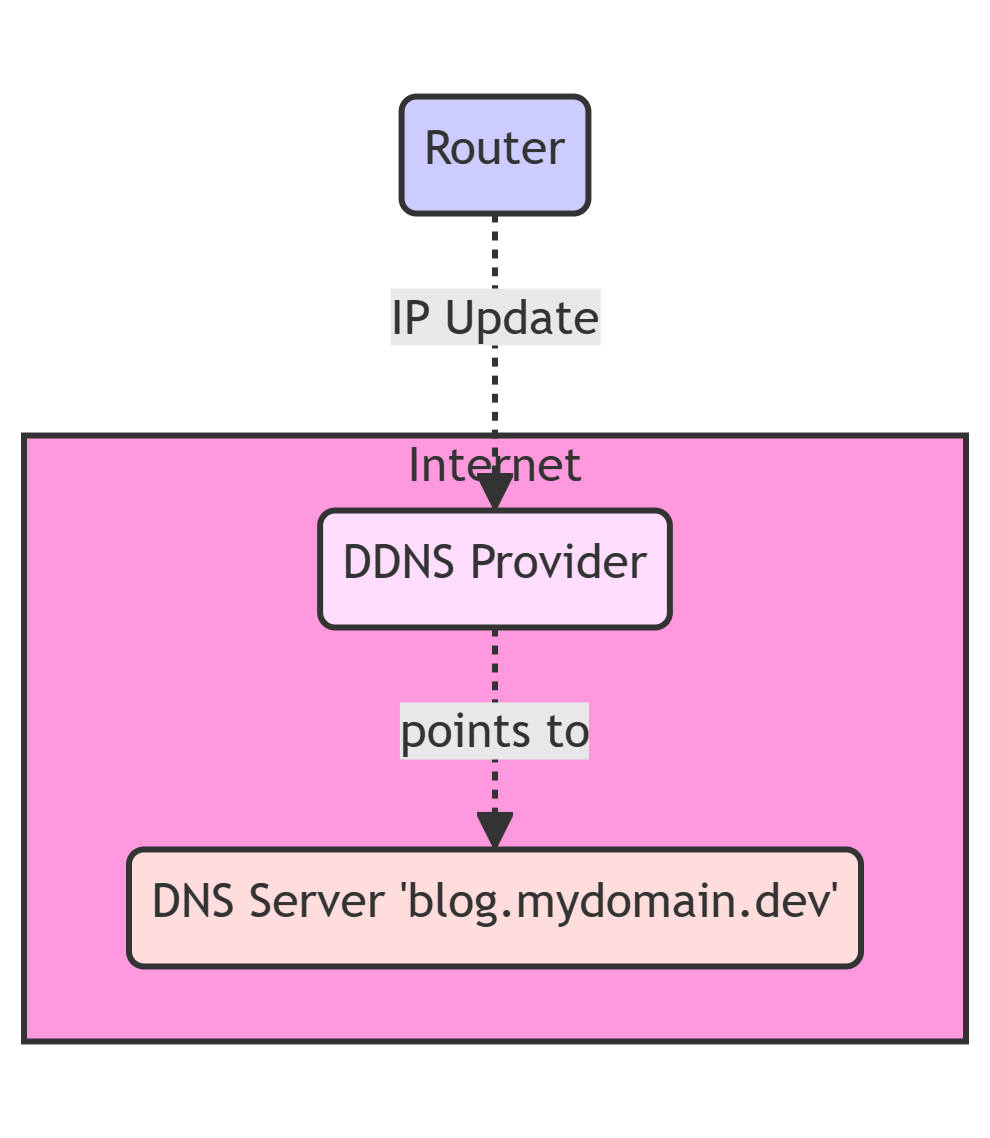
In order for your connection to be accessible later via a speaking domain, you must create a "DynDNS". In principle, "DynDNS" is nothing more than a service that reports your current IP address to a service and links it to your domain of choice. However, I will write a separate article about this soon. For now, I assume that this already works for you and that we can reach the connection fictitiously via mydomain.dev. A DynDNS works relatively simply:

DNS changes
You must now configure your DNS at your domain host so that all subdomains of *.mydomain.dev are forwarded to your DynDNS. To do this, however, your host must allow you to make changes to your DNS server.
We can redirect this quite easily using a Configure the CNAME entry . It is important here that you enter the CNAME as a wildcard. This has the advantage that you don't have to keep adjusting the DNS server for new subdomains. An example CNAME could look like this:
Name: *.mydomain.dev
Type/Prio: CNAME / 0
Data: mydomain.dev
This would now redirect all subdomains (e.g. blog.mydomain.dev) to mydomain.dev. The fact that they are all merged is not a problem at this point. We break this up again later in the reverse proxy.
The changes always take a while to replicate on all DNS servers for public DNS servers. This change can therefore take between 1 minute and several hours. However, it is usually very quick.
You can check this with the CNAME lookup tool.
Reverse Proxy
In order to be able to do anything at all, we need to set up a "Reverse Proxy". The way it works is explained quite simply. All requests are forwarded centrally to the reverse proxy. This decides where to forward the request according to certain criteria. This can be done via the port, the protocol or via (sub)domains, for example. In our case, we will concentrate on the domain part. As a reverse proxy, I can recommend "Nginx Proxy Manager" with a clear conscience:

The Nginx Proxy Manager has the great advantage that it can also directly provide suitable SSL certificates for your subdomains and that you can restrict access to certain network segments. For example, you can restrict Service A so that it is only accessible from your local network, but another Service B from the Internet.
For example, I host this blog here at my home. And this is what my configuration in the Nginx Proxy Manager looks like:

In concrete terms, this means that I make all requests from the domain blog.disane.dev reachable via HTTP to the IP 192.168.8.5(my DMZ network) via the port 2368. At the same time, I also had an SSL certificate created under the SSL tab:

You can of course place this on a service of your choice or simply test it first. Here you can also simply use a small Nginx server.
Configuring the router
In order for your router to be able to handle external requests, you first need to forward them. This is done with port forwarding. Here I recommend that you use port 80 and 443. We need port 80 for the requests from Lets Encrypt, which uses it to validate the SSL certificates.
The port forwarding should point to your Nginx Proxy Manager with both ports. For example, here is my configuration in my UDM-Pro:

Don't be surprised, the port 8080 and 4443 is already correct. I have the Nginx Proxy Manager running on my server in a Docker container with both ports exposed. Now all requests to your IP/DDNS would run against your reverse proxy. In principle, you're already done if you only want to provide services externally.
Make external domains available internally
Now, unfortunately, things are getting a bit wild. What would happen if your domain blog.mydomain.dev was accessed internally? If you're lucky, your request will go to your router, which won't be able to answer the question and will forward it to an external DNS server. At some point, your DNS server responds and says:
I knowblog.mydomain.dev, which points to mydomain.blog via the CNAME, which in turn points to the IP1.1.1.1(just as an example).
Do you see the problem? Exactly, you go out of the network once with your request and then back in again. Likewise all your other requests. Pretty stupid if you can have everything internally directly. It also has the advantage that if the network goes down and you no longer have internet, you can still access your internal services (secured via SSL) via the domain. And that's exactly why you need an internal DNS server.
Internal DNS server
To ensure that everything works internally, you need an internal DNS server. I have opted for AdGuard-Home here. It works in a similar way to PiHole but can do a lot more (an article on this will follow soon). It can not only filter ads at DNS level, but is also a DNS server at the same time. Very cool!
This also works with any other DNS server that can handle DNS rewrites.
We now configure practically the same thing in the DNS server as in the external server. Namely, that all queries from the wildcard domain *.mydomain.dev should point to your reverse proxy). In my case, for example, it looks like this:

Here you can also set up special redirects for simple devices, for example.
The test
You can now simply test our construct. Take a look at your domain with the DNS lookup. Let's take my blog subdomain as an example. It now points to my IP address:

I deliberately didn't black them out because you can get them out anyway. If you now check this with your DynDNS, it should match.
You can see this from the fact that the A record of blog.disane.dev points to my IP. This is because the CNAME is just an alias to another hostname, namely that of your DynDNS. The DynDNS is nothing more than a variable A-record that is repeatedly fed with your IP by the router.
If you now check your subdomain internally, you should now be able to resolve it on your reverse proxy:

If you see that the requests are leaving your network incorrectly, you will need to rework the configuration and check why they are leaving. They should actually stay in your network with the help.
You should also be able to see the correct paraphrase in the AdGuard home, for example.
The final result
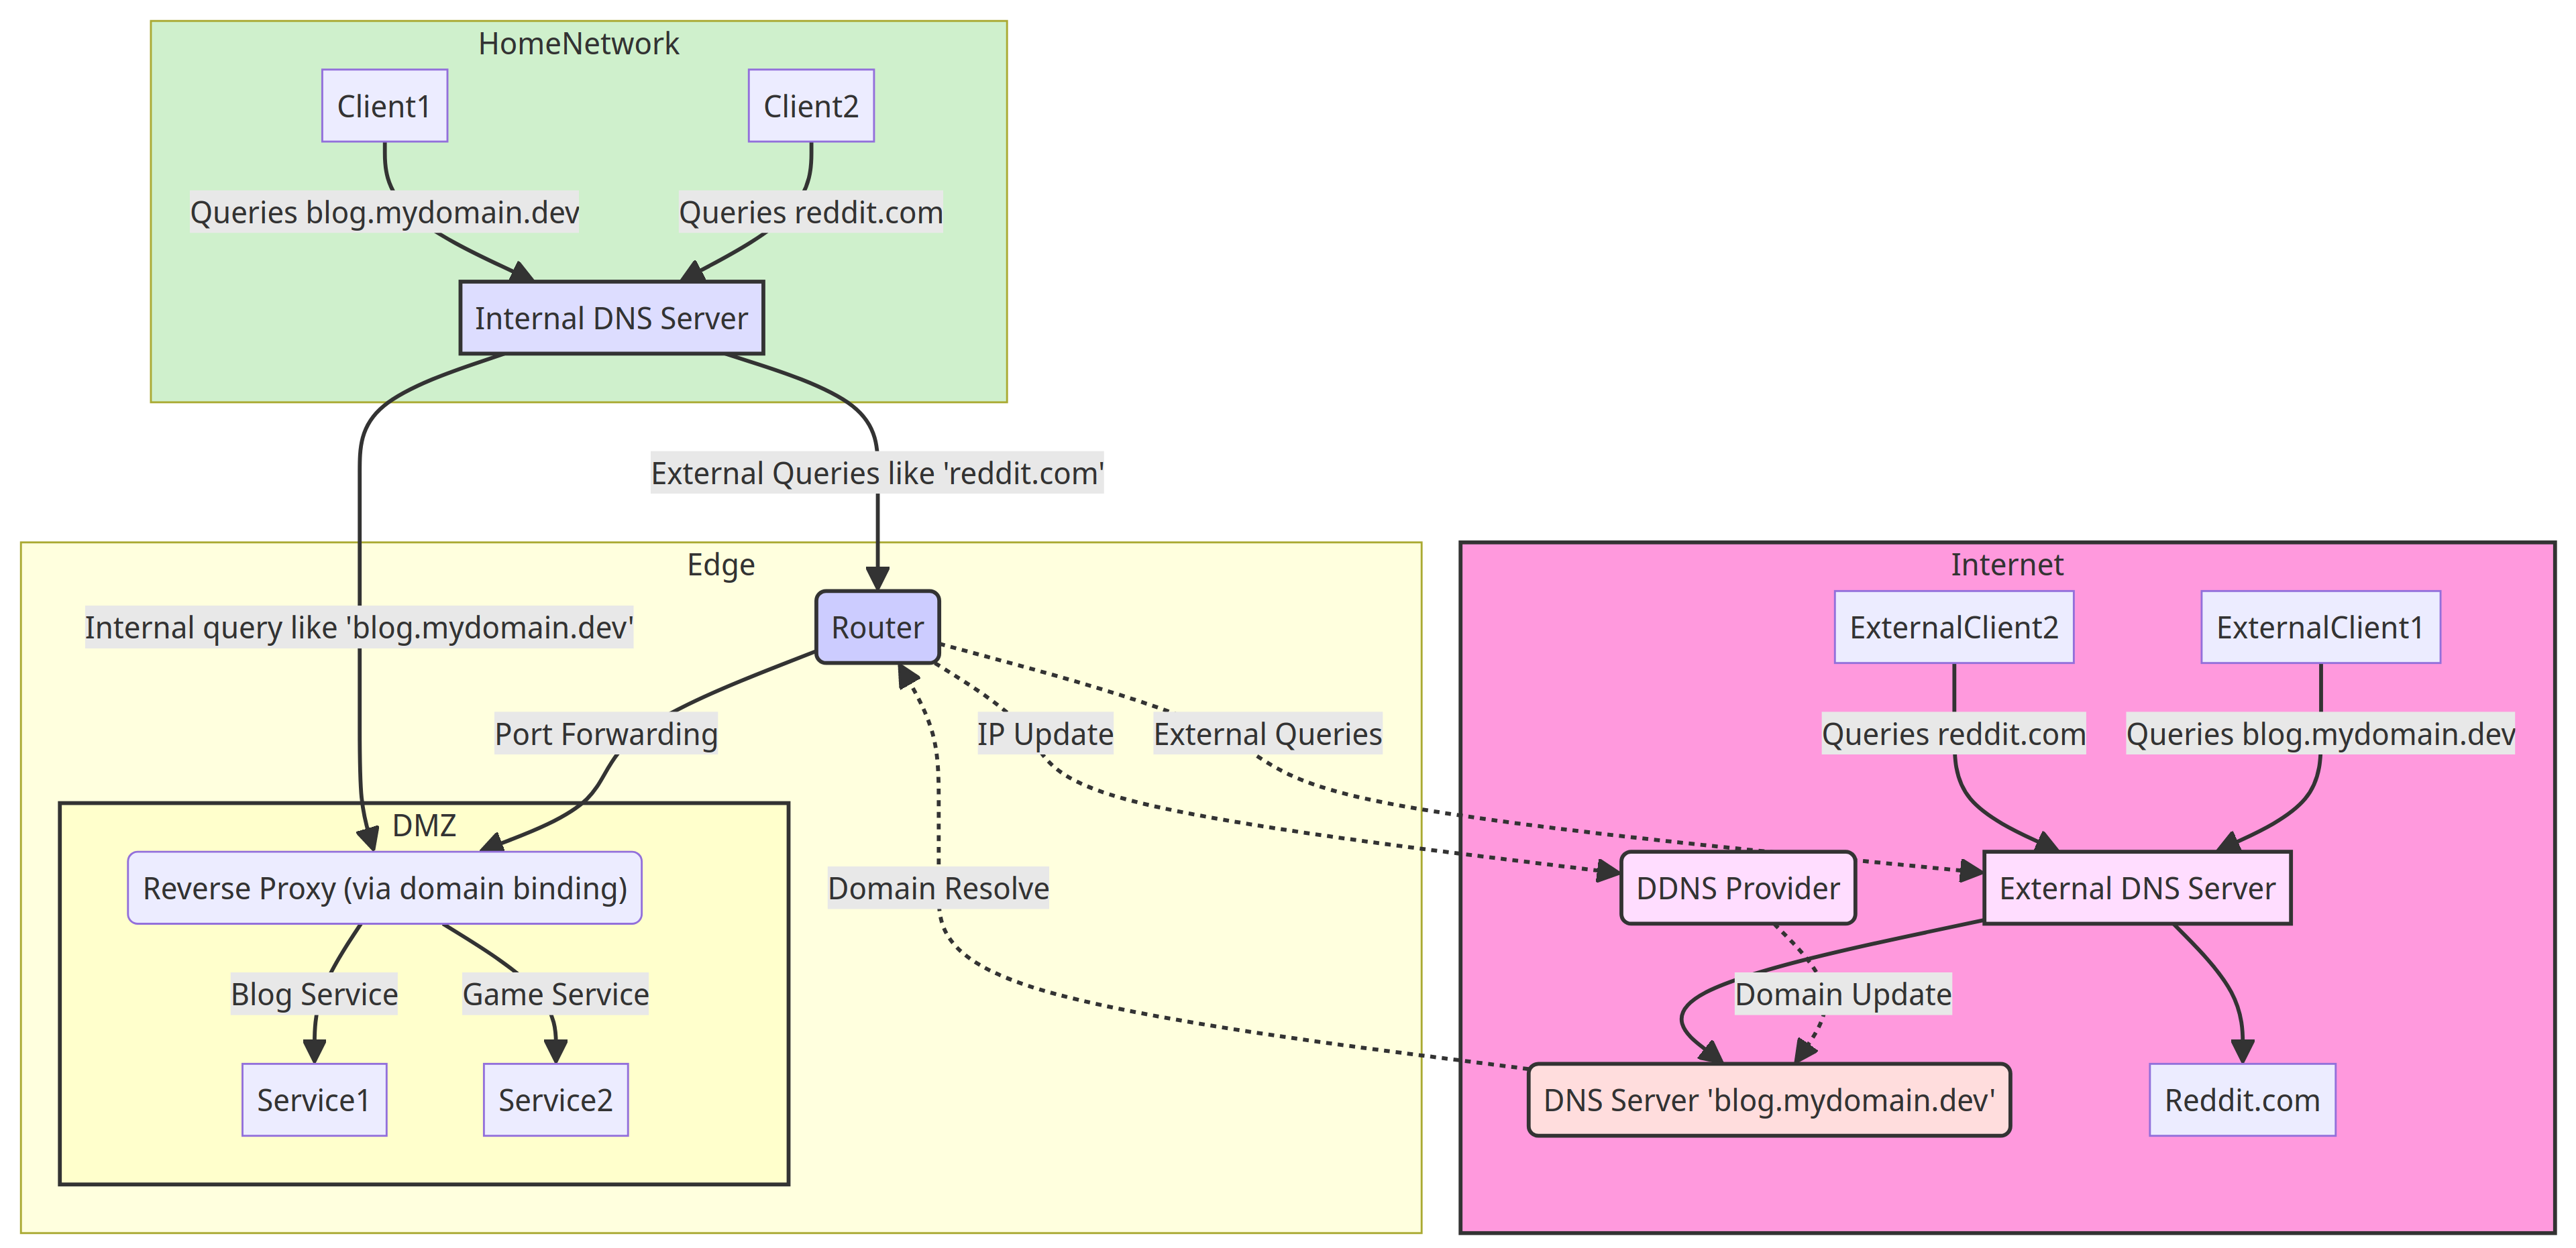
The final result should now look like this (schematically):

If this all works, you have now managed to both release services externally via a (sub)domain, forward them internally, set up a reverse proxy that distributes the requests and also set up an internal DNS server that also maintains internal requests to the (sub)domains internally. In addition, all your internal services are now also secured via SSL using the Nginx Proxy Manager. Cool, isn't it?🎉
